|
이번에는 QT에서
Component들을 정렬하는 Layout Manager에 대해 알아 볼 것입니다.
GUI Application에서는
그 기능 만큼이나 생김새도 중요합니다. 그 중에서도 Component들을 잘 정리 해야 보기 좋은 Application이 될 수 있을
것입니다.
이전의 예제에서는 Component들의 상대적인 위치를 지정함으로 Component들을 정렬 시켰었는데
이제는 Layout Manager라는 것을 이용하여 Component들을 정렬 시킬 것입니다.
Layout
Manager는 미리 정해져 있는 몇가지 방식으로 Component들을 정렬 시키는 것인데 일단 Code를 보도록 하겠습니다.
◎ vboxlayout.h
1 #ifndef __VBOX__
2 #define __VBOX__
3
4
#include <qwidget.h>
5 #include <qapplication.h>
6 #include <qlayout.h>
7 #include
<qpushbutton.h>
8 #include <qlabel.h>
9
10
#define kor(str) QString::fromLocal8Bit(str)
11
12 class
VBOX : public QWidget{
13 public:
14 VBOX();
15
16
private:
17 QVBoxLayout *vbox;
18 QLabel *label;
19
QPushButton *quit;
20 };
21
22 #endif //__VBOX__
|
◎ vboxlayout.cpp
1 #include "vboxlayout.h"
2
3 VBOX::VBOX(){
4
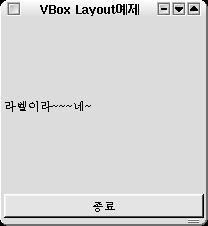
setCaption(kor("VBox Layout예제"));
5 setGeometry(200 , 200 , 200
, 200);
6
7 vbox = new QVBoxLayout(this);
8 label = new
QLabel(kor("라벨이라~~~네~") , this);
9 quit = new
QPushButton(kor("종료") , this);
10
11
vbox->addWidget(label);
12 vbox->addWidget(quit);
13
14 connect(quit , SIGNAL(clicked()) , qApp , SLOT(quit()));
15 }
16
17 int main(int argc , char *argv[]){
18
QApplication app(argc , argv);
19
20 VBOX *vbox = new
VBOX();
21 vbox->show();
22
23 return app.exec();
24 }
|
|

|
먼저
vboxlayout.h의 6번째 줄에서 Layout Manager를 사용하기 위해 qlayout.h를 include하고 있는데 이것은
이후에 보게되는 다른 Layout Manager를 사용하더라도 같은 내용입니다.
vboxlayout.cpp에서는 먼저
7,8,9 Line에서 각각의 Component들을 초기화 하고 11 Line과 12 Line에서 각각의 Component들을
정렬합니다.
Layout Manager를 이용하여 Component들을 정렬하는 것은 단순합니다. 먼저
Component들을 만들고 만들어 놓은 Component들을 Layout Manager의 addWidget의 인자로 넘겨주면서
붙이면 각각의 Layout Manager들이 알아서 Component들을 정렬합니다.
다음은 HBoxLayout에 대한
내용입니다.
◎ hboxlayout.h
1 #ifndef __HBOX__
2 #define __HBOX__
3
4
#include <qwidget.h>
5 #include <qapplication.h>
6 #include <qlayout.h>
7 #include
<qpushbutton.h>
8 #include <qlabel.h>
9
10
#define kor(str) QString::fromLocal8Bit(str)
11
12 class
HBOX : public QWidget{
13 public:
14 HBOX();
15
16
private:
17 QHBoxLayout *hbox;
18 QLabel *label;
19
QPushButton *quit;
20 };
21
22 #endif //__VBOX__
|
◎ hboxlayout.cpp
1 #include "hboxlayout.h"
2
3 HBOX::HBOX(){
4
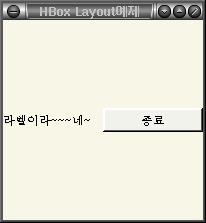
setCaption(kor("HBox Layout예제"));
5 setGeometry(200 , 200 , 200
, 200);
6
7 hbox = new QHBoxLayout(this);
8 label = new
QLabel(kor("라벨이라~~~네~") , this);
9 quit = new
QPushButton(kor("종료") , this);
10
11
hbox->addWidget(label);
12 hbox->addWidget(quit);
13
14 connect(quit , SIGNAL(clicked()) , qApp , SLOT(quit()));
15 }
16
17 int main(int argc , char *argv[]){
18
QApplication app(argc , argv);
19
20 HBOX *hbox = new
HBOX();
21 hbox->show();
22
23 return app.exec();
24 }
|
|

|
HBoxLayout은
Component들을 가로로 정렬 한다는 것만 다르고 VBOX와 모든게
동일합니다.
|
|
이번엔 Grid
Layout에 대해서 알아보겠습니다. 우선 예제코드는 아래와 같습니다.
◎ gridlayout.h
1 #ifndef __GRIDLAYOUT__
2 #define __GRIDLAYOUT__
3
4 #include <qapplication.h>
5 #include
<qwidget.h>
6 #include <qlayout.h>
7 #include
<qpushbutton.h>
8 #include <qlabel.h>
9
10
#define kor(str) QString::fromLocal8Bit(str)
11
12 class
GridLayout : public QWidget{
13 public:
14 GridLayout();
15
16 private:
17 QGridLayout *grid;
18
19
QLabel *label[5];
20
21 QPushButton *quit;
22 };
23
24 #endif //__GRIDLAYOUT
|
◎ gridlayout.cpp
1 #include "gridlayout.h"
2
3
GridLayout::GridLayout(){
4 setCaption(kor("GridLayout 예제"));
5 setGeometry(200 , 200 , 200 , 200);
6
7 grid = new
QGridLayout(this , 2 , 3);
8
9 label[0] = new QLabel(kor("라벨
1") , this);
10 label[1] = new QLabel(kor("라벨 2") , this);
11 label[2] = new QLabel(kor("라벨 3") , this);
12 label[3] =
new QLabel(kor("라벨 4") , this);
13 label[4] = new QLabel(kor("라벨
5") , this);
14
15 quit = new QPushButton(kor("종료") ,this);
16 quit->setFixedSize(quit->sizeHint());
17
18
grid->addWidget(label[0] , 0 , 0);
19
grid->addWidget(label[1] , 0 , 1);
20
grid->addWidget(label[2] , 0 , 2);
21
grid->addWidget(label[3] , 1 , 0);
22
grid->addWidget(label[4] , 1 , 1);
23 grid->addWidget(quit
, 1 , 2);
24
25 connect(quit , SIGNAL(clicked()) , qApp ,
SLOT(quit()));
26 }
27
28 int main(int argc , char
*argv[]){
29 QApplication app(argc , argv);
30
31
GridLayout *gridlayout = new GridLayout();
32
gridlayout->show();
33
34 return app.exec();
35 }
|
|

|
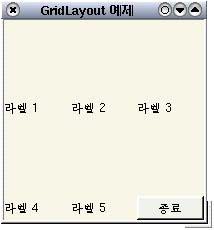
이 예제는 QT의 세번째
Layout Manager인 Grid Layout입니다. 이전의 HBoxLayout이나 VBoxLayout은 Component를
위에서 아래 또는 좌에서 우로 정렬하는 것 뿐이었지만 이 Grid Layout은 GUI Application을 일정한 크기로 나눈뒤
거기에 Component를 위치시키는 방식을 사용합니다.
gridlayout.cpp의 7 Line에서 세로 2칸 ,
가로 3칸에 Component를 위치시킬 수 있도록 GridLayout을 초기화 합니다. 그리고 17Line에서 22Line까지에서
Component를 붙일 위치를 지정하면서 Component를 붙이고 있습니다.
※ 참고
QT에서
만든 Component들은 창의 크기를 조절하면 해당 Component의 크기도 자동으로 조정 되는데 만약 창을 Resize해도
Component들의 크기를 고정하고자 하면 각각 Component객체의 setFixedSize Method를 호출하고 인자로는
Component객체의 sizeHint() Method의 반환값을 넘겨주면 됩니다. 즉 16 Line에서 처럼
quit->setFixedSize(quit->sizeHint());
|
|
|
앞에서 살펴 보았던
Layout Manager들은 Component를 정렬하는데 각각 Component를 위에서 아래로(VBox) 혹은 좌에서
우로(HBox) 혹은 일정한 크기로 나눈후 정렬(Grid)하는 방식이었습니다.
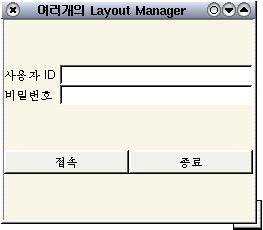
여기에서 한가지 생각해 볼 수 있는기능은
여러개의 Layout Manager를 동시에 사용할 수 없는지.
예를들어 다음과 같은형식으로 Component를 정렬하는
방식을 생각해 볼 수 있습니다.
|

|
위와 같은 내용으로
구성하기 위한 Code는 다음과 같습니다.
◎ complex_layout.h
1 #ifndef __COMP__
2 #define __COMP__
3
4
#include <qapplication.h>
5 #include <qwidget.h>
6 #include <qpushbutton.h>
7 #include <qlabel.h>
8 #include <qlayout.h>
9 #include <qlineedit.h>
10
11 #define kor(str) QString::fromLocal8Bit(str)
12
13 class Complex_Layout : public QWidget{
14 public:
15
Complex_Layout();
16
17 private:
18 QVBoxLayout *vbox;
19 QHBoxLayout *hbox;
20 QGridLayout *grid;
21
22
QLabel *lb_user;
23 QLabel *lb_pass;
24
25 QLineEdit
*le_user;
26 QLineEdit *le_pass;
27
28 QPushButton
*pb_login;
29 QPushButton *pb_quit;
30 };
31
32
#endif //__COMP
|
◎ complex_layout.cpp
1 #include "complex_layout.h"
2
3
Complex_Layout::Complex_Layout(){
4 setCaption(kor("여러개의 Layout
Manager"));
5 setGeometry(200 , 200 , 200 , 200);
6
7
vbox = new QVBoxLayout(this);
8 grid = new QGridLayout(vbox , 2
, 2);
9 hbox = new QHBoxLayout(vbox);
10
11 lb_user =
new QLabel(kor("사용자 ID") , this);
12 lb_pass = new
QLabel(kor("비밀번호") , this);
13
14 le_user = new
QLineEdit(this);
15 le_pass = new QLineEdit(this);
16
le_pass->setEchoMode(QLineEdit::Password);
17
18 pb_login
= new QPushButton(kor("접속") , this);
19 pb_quit = new
QPushButton(kor("종료") , this);
20
21
hbox->addWidget(pb_login);
22 hbox->addWidget(pb_quit);
23
24 grid->addWidget(lb_user , 0 , 0);
25
grid->addWidget(le_user , 0 , 1);
26
grid->addWidget(lb_pass , 1 , 0);
27
grid->addWidget(le_pass , 1 , 1);
28
29 connect(pb_quit ,
SIGNAL(clicked()) , qApp , SLOT(quit()));
30 }
31
32 int
main(int argc , char *argv[]){
33 QApplication app(argc , argv);
34
35 Complex_Layout *cl = new Complex_Layout();
36
cl->show();
37
38 return app.exec();
39 }
|
여기에서 주의 깊게 볼 것은
complex_layout.cpp의 8 , 9 Line입니다.
GridLayout과 HBoxLayout 생성자의 첫번째
인자(Parent) 즉 이 Layout Manager를 붙일 곳을 vbox로 지정하고 있습니다. 이렇게 함으로써 Layout
Manager에 또 다른 Layout Manager를 붙일 수 있게 됩니다.
다음시간엔 QT에서 가장 중요한 기술 중
하나인 Signal과 Slot에 대해 알아
보겠습니다.
|
|


